Thursday 22 December 2011

Rule of Thirds

This comp was published in the Newman news I was so excited for the person that won.  First of all the Rule of Thirds was a challenge the challenge being can you take an image that represents the Rule of Thirds.  There were some great shots and much debate about if some of the images represented the Rule of Thirds or if they were just nice images.  The comp was not the usual popularity contest that every one could vote on but was instead voted on by professionals within the group.

The winner of the comp was Dave Curtis who found out while on holiday to Bali (Lucky Dave).  The image of the famous Lions Park Emu perfectly represented the Rule of thirds with the eye of the emu on two intersecting lines and its necks following one of the Vertical axis.

RED comp

RED
Winning image by Rusty Baker, Hand Rail Pool, Karijini
Simone Pes
Red could mean so many things in a comp, and the Pilbara Photography Group showed many forms of Red it was a very popular comp and members of the group loved the varying interpretations that were presented in the competition.   The winning image was taken at the amazing Hand Rail Pool by Rusty Baker.  Rusty is a regular entrant into competitions and always has a high standard to work.  Well done Rusty we all look forward to seeing more of your images in future comps and challenges.

Jess Fenwick Red Balloons - Miners Park Reserve Newman
Dave Curtis (Fire works at Capricorn Oval)

Chillax the Theory of chilling out and Relaxing comp

Chillax is a combination of words chilling and Relaxing.  Its important to always do a bit of both especially in the Pilbara where we do work those long hard hours.

The images were great in this competition and travelled Australia and the world to find the images.  The Winning image by Normandie Meyer one of the pro Photographers.  Normandie said it was taken in Paternoster, Western Cape, South Africa on a family holiday.  The long photo was cropped and looks wonderful.  Well done Normandie your Medellin will be sent to you once they are made.

www.facebook.com/pages/Normandie-Meyer-Photography/10594650951694

Sunday 27 November 2011

Daily Toil

Competition 4 Daily Toil 

Daily toil could mean so much, it was a great comp with some fabulous images.

The winner and for good reason was Jessica Brockwell, whose image of a rodeo was stunning. Jess said her shot was taken with a point and shoot.  This image is an amazing example on how changing the perspective can make the image POP.

Special mention was given to Andrea Church who's image of rocks falling from a conveyor belt showed off her obvious talent in photography. 

Well done


Next weeks comp is RED looking forward to the amazing images

Wednesday 23 November 2011

Diary of dates

Competitions and Challenge Dates
This is not a definitive list of what the competitions will be as they may change as the group develops.

1 Everything Pilbara
2Pilbara animals Done
3 Plants done
4 Daily Toil done
5 RED Starts Monday 21st Nov
6 'Chillax The concept of Chilling out and Relaxing' Starts Monday 28th Nov
7 Rule of Thirds Starts Monday 5th Dec (Photoshop) Challenge
8 'Action shot' Starts Monday 12th Dec
9 Summer Starts Monday 19th of Dec to 11th Jan
10 Our volunteers Starts Monday 16th Jan
11) Self Portrait Starts Monday 23rd Jan Challenge
12 One Image Many Scapes  (Photoshop) Starts Monday 30th Jan
13 Brilliance Starts Monday 6th Feb
14 Geology Starts Monday13th Feb
15 Food Starts Monday20th Feb
16 Advert (Photoshop) Starts Monday27 Feb Challenge
17 Blue Starts Monday5th March
18 Love your Town Starts Monday 12th March
19 Kissing the stars Starts Monday 19th March
20 Storm Show (photoshop) Starts Monday 26th Challenge
21 Most Prized starts Monday  2nd April
22 Natural Landscape starts Monday 9th Arpil
23 Weather starts Monday 16th April
24 Joy starts Monday 23rd April
25 Abstract (Photoshop) Starts Monday 30th April Challenge


More to come :)

Tuesday 22 November 2011

This weeks theme for the photography competition was Pilbara Animals and it was a double vote due to a 4 way tie.  The winners for the comp with 10 votes each were Katrina Anne McCann, Melita Masterman, Kelly Johnson AND Partiesby Imagination also known as Helen Finn ,well done to all of you for putting in such wonderful images.  The second vote which decided the overall vote was made by the professional photographers in the group and the admins.

The end winner was an amazing image by Helen Finn who took this while wading through reeds.  Jody Ellis,  photographer and one of the expert judges stated that she loved the depth of field. 'You have the subject in focus, and there are no distractions from your photos stars, but also the moment that you have managed to capture is one of the reasons I give you my vote.  Dragonflies, especially this particularly small species, are hard to catch at the best of times. But here, you have them mating as well. A hard shot, and you nailed it. Well done'.

Helen is a Newman Icon who produces fabulouse cakes for all events and loves taking photos or anything but people.  

Well done helen 


The runner up images which were all as stunning. I would like to thank everyone for participating. voting and most of all loving the competitions and being so helpful


Wednesday 16 November 2011

Rule of Thirds or THE GOLDEN RULE

 Rule of Thirds
The Rule of thirds has been around and abouts in the Artist community in some form since Roman Times.    It is used in art and photography alike.

First to understand what we're on about:
Take an image and draw imaginary lines onto it as per the image on the left.
 

At this point you've broken the image into thirds both horizontally and vertically, also known as breaking the image into Nine equal parts. 

By doing this you will have two main components of the thirds theory the horizontal and Vertical lines and the cross hairs shown in green.


How to use it!!

The Above diagram is important as it: 
  • Shows locations of the cross hairs which are possible locations for focal points within the intended photo
  • Shows Horizontal and Vertical lines that give possible placement of points of interest focal points and
  • Allows you to split the image up into equal parts i.e. sky water land, or sky water, water wave.
and when you follow this rule it usually produces a more pleasing image for the human eye, there are lots of Science reasons why this rule works and you do not always have to follow it as sometimes breaking the Rules is so much FUN.  

Exanple one 

The Bird is first of all stunning, but the image is also well set out and follows the Rule of Thirds closely.  

      1. The Eye sits on an intersection of vertical and horizontal lines and so becomes a focal point of the image
      2. The neck runs up one of the vertical lines making the Bird also a focal point  
      3. The point of this image is the bird and so it was cleverly placed in the best position possible.  


Another Rule of Thirds Example

(I nicked this one off another web site)


rule-of-thirdsIn this image I’ve purposely placed the head of my subject on one of the intersecting points – especially his eyes which are a natural point of focus for a portrait. His tie and flower also take up a secondary point of interest.
rule-of-thirds

In this shot I’ve placed the subject along a whole line which means she is considerably off center and therefore creating an additional point of interest. Placing her right in the center of the frame could have resulted in an ‘awkward’ shot.

In a similar way a good technique for landscape shots is to position horizons along one of the horizontal lines also as I’ve done with the following shot (I’ll let you imagine the line

Read more: http://www.digital-photography-school.com/rule-of-thirds#ixzz1drnMOuxt

Friday 11 November 2011

Alter the Perspective

Alter how you use Perspective
A chair with a 'Normal' Perspective

If your wanting to make your photo more interesting consider changing the perspective.

In Portraiture for example, it is common to take the image using a front on perspective. Consider for something different changing the perspective.   Below are some ideas on ways to get creative with your perspective all have merit when used in the right way.

Birds Eye perspective 
High and above: As it sounds high means take the image from above your commonly known as a birds eye view.  Remember if it's human you can always ask them to move to accomidate the image vision you have.  

Way Down low Perspective
How Low Can You Go: taking an image looking up to your opject.  It can be rather hard when you finally have to get your self off the ground I have hung from rocks to get a perfect shot from below (Never again).  

 p.s. their my kids chairs so their not clean although I was told that once they were ;)
More on Perspectives to come in the coming weeks (If I remember so just remind me)


Competition number two 'Florals'

Competition Number two 'Florals' 


This weeks theme for the competition was Florals.  Some really amazing entries were submitted and I have added some of the stand outs down the bottom of this post.  The Ultimate winner was Kelly Johnson with an amazing image of a Green Bird Plan

To get this shot the photographer used a Sony Sybershot point and shoot,  with a flash to brighten the image up. 
. 
 The competitions second placed image, a macro shot of Mulla Mulla, was Taken by Elly Bla who used a 50mm Macro lens for the shot.  Elly said she used manual focus on her macro lens then she just focused on which part she wanted to focus in on and the rest blurred. 


The below are a few of the stand out images from the comp I have included the photographer for each image

Jody Smith Photographer of Jody Ellis Photography 
This image is a Banksia the photographer wanted people to think out side the box when it came to florals.

This images shows off the amazing structure of a flower how stunning
Jody Smith Photographer of Jody Ellis Photography

 Dave Curtis our first ever competition winner always puts amazing images in the competition.  This image of a lotus flower was no exception
This amazing pink flower taken by Marta Bogaczomalley had lots of comments well done Marta on an image I fell in love with as soon as I saw it.  


Next weeks comp will be Daily Toil

Sunday 6 November 2011

How to get THE shot.

This image was entered into our second competition and we were all amazed at the image so a few got together including the AMAZing photographer and figured out how to do it all.

First of all the amazing Photographer was Elly Bla she used a 50mm Macro lense for the shot.  Then Elly said she used manual focus on my macro lens then she just focued on which part she wanted in focus and the rest just blurs out of focus- having a macro lens. her exact camera settings were The settings were
f /3.2 @ 1/40 secs
ISO 200
Focul Length: 50mm


Lilly Frost from Tilladilli photography gave us a fitrther rundown with the more technical side of the shot.  She said
The blurry background effect, 'bouquet' is the technical term, is achieved by using a low F stop/aperture which allows the lens opening to be wide. selecting a low aperture number allows for minimal depth of field or minimal view in focus, selecting a high aperture number allows for maximum depth of field therefore more field of view in focus. You can achieve this on you DSLR by turning your mode dial to 'Av' for Canon, and 'A' for Nikon (not sure for other brands) and setting your Aperture to the minimum number your lens allows (use your manual to help set your aperture) focussing on the near object and the rest will be out of focus. The lower the aperture number the better the results. Pro lenses achieve a better quality bouquet as they stop down to aperture 1.4, 2 or 2.8, and have better quality glass. Focal length and distance between & foreground background will also change results. True Macro lenses intensify shallow depth of field.

A little side not from Lilly: On Av or A mode your camera will automatically set the shutter speed for you. If there isn't enough light and your shutter speed is to slow (camera takes to long to take the picture) increase your ISO speed to allow more light into your sensor (refer to manual) which will increase shutter speed.


Friday 4 November 2011

Layers

LAYERS Great for landscapes


Cutting a landscape into definable layers can help make a dull image interesting, giving it depth. 

 In this image any of the separate parts would be fairly boring however together thay look more interesting
Background, Forground and Middle are your basic layers.  each will generally take up about a third of the image and this is a great way to put another perspective on a landmark like a mountain or seascape. 


Above image is Rudall River, WA 2011 it was in the middle of the day and so the colour is washed out but the layering is good.

Thursday 3 November 2011

Composition of images

So the Dolls in this post were used as I was not allowed to use my kids in the image.  I have added Army Tedda for a bit of variety oh and I dont collect these things my mum gave them too my daughter and I didnt have the heart to throw them out. 


composition basics


People Shots
commonly people take photos of people and its a skill. Here are some basic soncepts on composition I will be putting up a few more of these as we head into our Portiture cometition in a few weeks. 
  1. ELS = Extreme Long Shot (person in their surroundings)
  1. LS = Long Shot (whole body)

  1. MS = medium shot (waist up)

  1. MCU = Medium close-up (mid chest up)

  1. CU = Close-up (head and shoulders)
  1. ECU = Extreme Close-up (face - or eyes!)


  1. OTS = Over the Shoulder

  1. Single = one person in the frame

  1. 2-Shot = two people in the frame
  1. 3-Shot = three people in the frame  


    Wednesday 26 October 2011

    Tips for the Week Jody Ellis Photography

    Shutter 
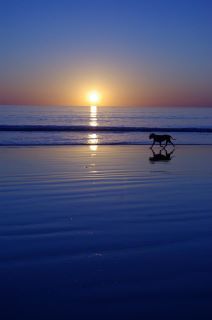
    Shutter speed - shutter speed is how long you are exposing a photo (on my canon 550D and above, you can see it in mode 'TV' for example, and it's top left eg. 1/125). To capture fantastic night shots, you can't use a regular shutter speed (i.e. 250) as all you will get is black. This is because you don't have a long enough exposure, you need to draw it out. BUT, longer exposures (i.e. 80) require either a VERY steady hand, or a tripod. This is because as the photo is exposed for longer, a shaky hand can cause blurring in the image, even with IS. You can also acheive fantastic slow motion, this is how I captured those fantastic fire twirling photos from the Outback Fusion event.


    images taken from
    http://www.homephotog.com/tutorials/shutter-speed.shtml


    Equipment 
    Don't ever feel like you can't be good at what you do just because you don't have the most expensive or most equipment out there. I started out with a 3.2mp hand held konicaminolta taking photos of flora and fauna and framing and selling them at local markets to raise funds for a new camera. In the end, I pretty much sold my soul for a digital SLR, I saved for 3 years for it. It's not so much the equipment that makes a photo, but the persons ability to 'see' a good photo and know how to use what they have to it's best potential.

    Julie-anne Johnston Says, I took this image with a second hand point and shoot camera, its a great image, shame about the time stamp (Was still learning how to use it at the time I took this).  


    Didgital SLR's Sensors
      Digital SLR's use Sensors, and in this case, size does matter. The bigger the sensor, the better the quality of photo you can acheive. It is more important than your pixiles! To reduce your maintenance, ensure the digital SLR you buy has a self cleaning sensor! (Canons have this feature).


    Thankyou Jody from Jody Ellis photography 

    Tuesday 25 October 2011

    Tungsten (How to get really blue)

    Tungsten film is balanced for indoor photography under tungsten light, and is primarily used to eliminate the orange tint caused by (tungsten) light bulbs, and gives the final image a natural color balance.

    When shot outdoors, tungsten film produces a strong blue cast, an effect which is often used purposely to create different color contrasts making it look like night or better showing up water

    Ideas for use have included daylight films so they look like night to do this you underexpose the film commonly done in movies

    There is a heap of explanation as to  why tungsten does what it does but above is the shortened version if you want the full explanation try out Tungsten Film.

    Photo by the amazing Nathan Seivwright

    Monday 24 October 2011

    Competition Walk About

    This weeks competition is walk about the aim to take you camera out with you and take photos that interest you.  I did this here is my example which wont be added to the competition.  There are a few extra rules and the Mastermind behind it Jody smith from Jody Photography said its a fun way to explore your camera and surrounds.

    Competition
    Your challenge is to take your camera with you on a walk and photograph anything you find interesting on the way. You must then share your album on the group, DO NOT upload your images directly to the group as this will clog and confuse the page. (To do this, look at the bottom of your album, click share and chose to share with a group, pick our photography group). Please make sure your album is set to 'public' so that everyone can visit and see.

    Feel free to describe each photo and why you thought it was interesting. Share where you walked.


    Rules
    Example


    Really sorry about the date stamp its a second hand camera I got yesterday and I am still figuring it out. 


    Next Weeks Competition
    Next weeks competition will be 'Florals' normal rules apply for this comp